You’ve just taken your shiny new graphics card out of the box and you’re ready to pull the old one out and replace it with the more powerful alternative. But before you upgrade the hardware, or even if you’ve already done that, it’s never a bad idea to completely uninstall all the old Nvidia, AMD, and/or Intel drivers, getting rid of all the cruft and potentially freeing up a decent amount of storage in the process.
Whether you’re upgrading from one Nvidia card to another one or switching brands — going from Nvidia to AMD, vice versa, or even to an Intel Arc GPU — wiping out any remnants of the older card’s software is a good idea. The old drivers could harm performance or even lead to crashes. Also, if you’re currently experiencing problems with a graphics card you’ve had for a while — crashes, freezes, blue screens — nuking your drivers and starting over from scratch could solve your issues.
You might think that uninstalling old graphics drivers is a simple process and, on the surface, it is. All three major GPU manufacturers provide the option to uninstall their respective drivers via the Control Panel. Furthermore, you can elect to do a “clean install” when updating to the latest release. And a lot of the time, things will go swimmingly, with your PC and OS none the worse for wear.
But sometimes you end up with corrupted drivers that won’t uninstall properly, or perhaps they uninstall but leave behind undesirable remnants (cruft). We’ve experienced situations where performance in a game inexplicably drops, and the only way to ensure your drivers are clean is to really make sure they’re clean.
A handy utility appropriately called DDU (Display Driver Uninstaller (opens in new tab)) will do all the dirty work for you. It’s been around quite a few years now and gets routinely updated. It also has support for removing audio drivers as well as graphics. The important thing is that it’s programmed with all the knowledge of where AMD, Intel, and Nvidia store the various registry settings and files, so it knows exactly where to look at what to delete.
How to Uninstall Nvidia, AMD or Intel Graphics Drivers Using DDU
Follow these steps to get rid of every last piece of your old graphics drivers.
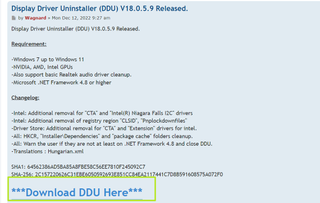
1. Download and launch the DDU installer from the Wagnardsoft website (opens in new tab). This is free software, but the company doesn’t make it easy to find the correct download link, because the pages are littered with ads that have “download” buttons in them that lead elsewhere.
The best bet is to find the “download and support” post for the latest version on Wagnardsoft’s forums and click the ***Download DDU Here*** link. At publication time, the latest forum post was for version V18.0.5.9 (opens in new tab) and going to that link would get you the download link.
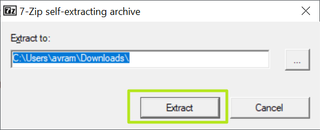
2. Extract DDU to the folder of your choice. It will create a subfolder with a name that contains DDU and the version number. You’ll get prompted when newer versions become available when you run the utility.
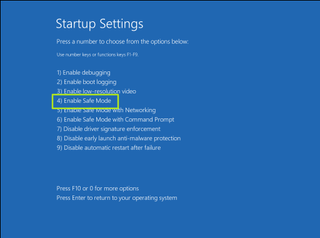
3. Boot Windows into Safe Mode (optional). Wagnardsoft recommends that you boot into Safe Mode before running DDU, but this is not absolutely necessary. We have used it in regular mode many times without issue. However, if you’re concerned that the program might miss something, you can go into Safe Mode.
We have an article on how to boot to safe mode in Windows. (That applies to both Windows 10 and 11). The quick answer is to go to Settings->Recovery->Advanced Startup, click Restart Now, wait for it to restart, select Troubleshoot->Advanced Options->Startup Settings->Restart and then enter 4 to Enable Safe Mode.
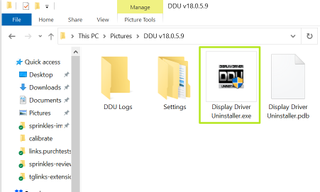
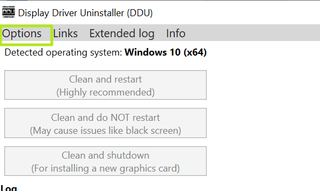
4. Launch Display Driver Uninstaller.exe from the folder the extraction created. Click Yes if prompted by Windows User Account Control. This will bring up the full program. If you are not in Safe Mode, the program will give a dialog box warning you that it recommends Safe Mode. You can click Ok and ignore it.
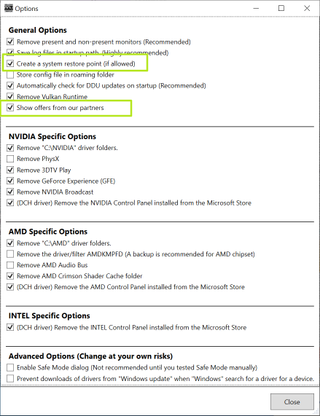
5. Click Options if the program isn’t already showing you the Options menu (which it does the first time you launch).
6. Uncheck “Show offers from our partners” and check “Prevent downloads of drivers from ‘Windows Update'” (under Advanced). We also recommend unchecking “Create a system restore point,” as that seems unnecessary and could be a waste of space. But if you’re concerned, you can leave it checked. Click Close when done.
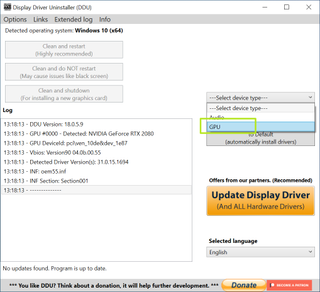
7. Select GPU from the device type menu.
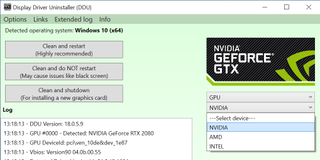
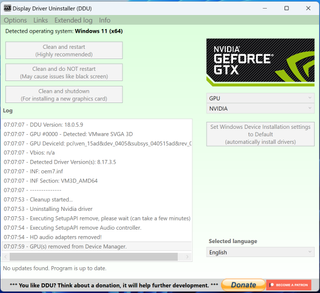
It should automatically detect the brand of GPU that’s currently installed and show it on screen. However, if it gets this wrong, you can choose the brand from another pulldown menu.
If you have installed drivers from other vendors in the past, you can select these from the pulldown menu and then click “Clean and do NOT restart” for each of them.
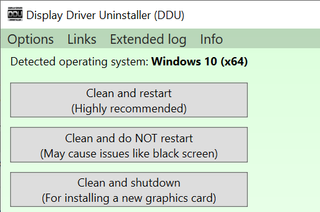
8. Click “Clean and shutdown” if you are planning to install a new graphics card right now. Click “Clean and restart” if you already have the GPU installed.
DDU will take a minute or two to remove all the drivers and cruft from the brand of graphics card you selected. While it’s going, you will see status updates in DDU’s log box. It will typically close any open Windows Explorer widows as well, a slight annoyance at times if you’re like us and have half a dozen locations open.
Remember, if you select Nvidia, it will only remove Nvidia drivers so, if you have remnants of other branded drivers, you will need to perform the process on those as well.
9. Install your new graphics card (if you haven’t already).
10. Boot your PC and download and install the appropriate drivers. You can get them from the following locations:
Some text from the intro of this article also appeared in a recent issue of Maximum PC.
